Tuesday, August 14, 2012

Family Command Center

Along with the shoe/backpack bench that I built in our laundry room, I knew I needed some sort of "Command Center".  3 kids + 3 sets of homework + 3 soccer teams = chaos!  So, in trying to keep that chaos somewhat organized I started pinning ideas of other family command centers.

I came across this

and this

and finally this


I especially love the sayings across the top!  I love the idea of the kids reading something inspiring on the way out the door.  LOVE IT!

I have a long wall space inside our laundry room that was perfect for our command center.  Except there was one huge eyesore problem...

THIS UGLY BOX!! Right in the middle of the wall...ummm thanks, Mr. Builder. 


And not only was it in the middle of the wall...it is BIG!  So, I have to cover it up.  Which makes some of the pretty ideas I had pinned just not possible :(

I decided to try adding some pizazz to the room by painting wide horizontal stripes first.


Looking better already!  18.5 inches are the height of these stripes.  I have 5 stripes total {3 light colored and 2 darker}  The lighter color will be the wall color on the other three walls eventually.  It is Oatbran by Valspar and the darker color is the next color on the paint chip. 


I installed basic hinges on a large cork board.  Look no more big ugly box {but we can still access it if we have to!}


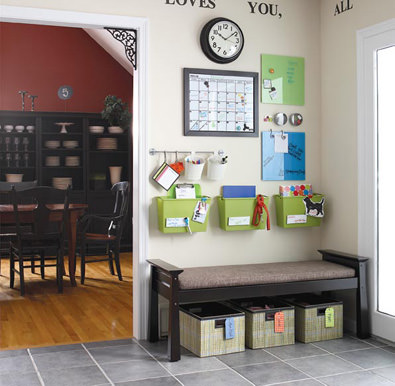
I added three magazine racks along side for each kids' papers/homework/class notes.  I wanted something cuter, but as it is 20+ miles to the nearest TJ's, Hobby Lobby, or Target...I had to use what I had. 

I think they will do!

I added labels on them, so there is no confusion as to who's box it is.  Walmart had these great little name tag holders and clips that made adding a label EASY!!


 I also needed a dry erase board to make my lists.  And of course someplace cute to hold the markers and eraser!!  :)


I am thinking of hanging my purse right under the dry erase board.  What do you think??? The door to the garage is just to the left, and that is the door I use 90% of the time.

Finally, I added some pretty things LOVE


So here it is in all it's FINISHED glory...


It is SO hard to get a good picture, sorry.  The room is so long and narrow, I just couldn't find a good angle.  But you get the picture!!  I hope!

Glad to have another project finished.  Mark it off the list!!! 

Linking to The Sunday Showcase, lizmarieblog, Thrifty Decor Chick, so you think youre crafty

Wednesday, August 8, 2012

Project Laundry Room Entry Way Organization

Back to school is just around the corner {12 days, but who's counting??  This mom is!}


We enter the house every day through our miniature laundry room.  It is long and narrow and has NO STORAGE...Ugh.  Last year, I thought I had found a way to organize the backpacks, lunch boxes, papers, shoes -- you know.  All. The. Stuff.

But within weeks, I realized it just wasn't working.  If the backpacks were hung on the hooks, then you couldn't open the door.  If they were left on the floor we tripped on them.  The area for lunch boxes was on a shelf above the washer...um, my kids were in elementary school and are short!  So, that wasn't working. Getting the picture??

Fast forward to this summer.  And until my annoying well behaved dogs did this...

That is the door to the garage {that we enter through} and to repair the wall I had to remove the cabinet.  In doing so, I not only realized that there was NOTHING stored in this cabinet that we used/needed, but that the space was pretty large and would be perfect for something like this beauty

https://blogger.googleusercontent.com/img/b/R29vZ2xl/AVvXsEh2nRO2ljnpdD4oKShwy0ozmIi1zLXYhwfxnEOJaytJPBfrJgDJTd5l40BEpGcHHWeKsvceqpiK41Ve48-t5-q-336BImADAOviKSkFmFmrYz1v9HJ2p9hWo1eawtpZNp3heOAEe25fTmF5/s1600/PICT7669.jpg


Now, I still have the lovely builder grade wire shelving in the laundry room...So I decided not to add the top cubby {but I think I can add it later, when I remove that awesome wire shelving}

Here is what happened over the next three or four days while the kids were off with the grandparents.


Base area for storage of shoes and pet supplies {the kids care for our cat and dogs so I want the supplies down where they can reach them}

Starting to look like something!!  Yay!


It fits!  Just a few finishing touches {I ran out of the trim piece and some of the nail holes need to be filled along with touch-up paint}


 Look...It works!  All loaded up with backpacks and lunch boxes.

Now, for the rest of the laundry room.  Any ideas?

 You can see how NARROW this room is.  I have a cork board to put up important paper {and cover the UGLY circuit breaker box} and that is a magnetic dry erase board leaning against the wall.  Hopefully it will be up soon.
 This is the other end of the room, looking back toward the door.  The cabinet holds the kitty's litter box and I have a bookshelf with the kids art supplies and games right next to it.  The breakfast area isn't far, and since we do art projects and play games at the table this seemed like the most likely spot.

I would love to de-clutter some more, and paint.  And add cabinets.  And make this room much more functional.  And make it bigger.   But some projects will wait, for now.


Close up on the pretty bead board and hooks,

Just very proud that this project is FINISHED!!!!!

Linking up with:

 House of Hepworths
<a href="http://www.houseofhepworths.com"><img src="http://www.houseofhepworths.com/wp-content/uploads/2010/11/HoHnew1.png" alt="HouseofHepworths" /></a>

Savy Southern Style
http://savvysouthernstyle.blogspot.com/

Project Cabinet Moulding...Done!

I guess my plan of blogging about my DIY projects actually worked...because I finished the moulding project that has been half way completed for 2+ YEARS!!!

Here it is in all it's finished glory!


 Nice finished outside corner!  Yay!


Thinking my 5 year old's art work and the lone plate are maybe not the hottest thing in kitchen design.  I definitely need some added accessories.  Oh well, I'll get to it someday.

I am currently considering repainting the red to Oatbran by Valspar.  It is a light tan color and since my kitchen has absolutely NO natural light, I think I need to get rid of the dark walls.  In fact, I am considering repainting most of the walls in my house.  We have covered porches on both the front and back of our south facing house, so what little light comes in the windows is currently disappearing against my red/chocolate/and dark tan walls. 

Time to lighten things up!!

But for now, I am just happy to have

FINISHED WHAT I STARTED! 

Tuesday, August 7, 2012

I finished the cabinet moulding!!

Oh. My. Gosh!

I actually finished the crown moulding on the cabinets...yay me!  But, it is now almost midnight and I don't have enough lighting for a good picture...boo :( so check back tomorrow and I will show you the finished project...

And all the other projects that have sprung up since I started this one!  Whoops.  Girl, just finish what you started!

Thursday, August 2, 2012

Progress

Progress is being made!  Yippee!!

So far I have removed the badly cut piece of moulding.


Started staining more moulding.

I am using a scrap piece to make sure I get the stain color correct.  A couple more coats of stain and it should be perfect!!

And I found out how to make sure my cuts are picture perfect...


Kreg's Crown Pro.   This little baby is so easy to use!  And my practice cut was pure perfection....LOVE!

I am so close to having this moulding INSTALLED!!!  It is looking good, if I do say so myself :)